After the WebGL above loads, click on it. Use the W/A/S/D keys to move E to initiate conversation
Overview
The unity asset is available for free on the unity asset store here
Features
- Speech bubbles
- Conversation trees
- Multilingual
- User definable UI
- Define variables and logic directly in C#
0
0: Hello World!
Code
To create a FluentScript we inherit from FluentScript, which is a Monobehaviour, and override the Create( ) method. In this first example the object this script is placed on will Yell “Hello World” when the script is executed.
|
1 2 3 4 5 6 7 8 9 |
using Fluent; public class Conversation0 : FluentScript { public override FluentNode Create() { return Yell(“Hello World!”); } } |
Setup
Add an empty GameObject to the object you want to yell. Here the object that will yell is called NPC 0 and the empty game object is called Talk.
We then add the Conversation 0 script to Talk. In this example talk also needs a collider so that we know when we are close enough to talk to NPC 0.
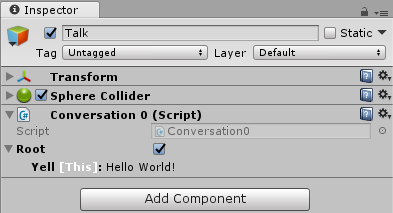
Yell shows the first canvas it finds in Talk. It then sets the first Text it finds within that canvas to “Hello World”. Note that the FluentScript’s output is presented as a tree under “Root”.
Initiating the conversation
To initiate a conversation we need to call Run( ) on the FluentScript. You can do that any way you’d like, but for the examples there is a script called FluentManager. If you would like to use FluentManager then add an empty GameObject to your scene and add FluentManager to it.
On FluentManager set the Text
UI element that will notify the player that there is something to talk to, as well as set your player.
1
1: OnStart() and OnFinish()
|
1 2 3 4 5 6 7 8 9 10 |
public class Conversation1 : FluentScript { public override void OnStart() { Player.Instance.CanMove = false; } public override void OnFinish() { Player.Instance.CanMove = true; } public override FluentNode Create() { return Yell(“Now you can’t move while I talk!”); } } |
Code
Override OnStart and OnFinish to specify what should happen before and after a FluentScript starts and ends. Here we disable player movement.
Encapsulate
Since we always want the player not to move when a converstation starts we encapsulate that information in a new class called MyFluentDialogue
|
1 2 3 4 5 6 7 |
using Fluent; public abstract class MyFluentDialogue : FluentScript { public override void OnFinish() { Player.Instance.CanMove = true; } public override void OnStart() { Player.Instance.CanMove = false; } } |
We will from now on inherit from MyFluentDialogue instead of FluentScript
2
2: Response Chain
|
1 2 3 4 5 6 7 8 9 10 |
public class Conversation2 : MyFluentDialogue { public override FluentNode Create() { return Yell(“I love …”) * Yell(“CAKE!”) * Yell(“And chained responses!”); } } |
Code
Yell is one of many FluentNodes, we can chain nodes. In this case we yell 3 times. A FluentNode completes before the next one in the chain is executed. Note that we need to use * to join them.
3
3: Others Yell
|
1 2 3 4 5 6 7 8 9 10 11 12 13 14 |
public class Conversation3 : MyFluentDialogue { public GameObject player; public GameObject npc4; public override FluentNode Create() { return Yell(“Anyone can yell!”) * Yell(player, “Oh!”) * Yell(player, “Mine looks different!”) * Yell(npc4, “Mine is a billboard!”).Billboard(); } } |
Code
Yell takes an optional parameter to specify the object that should do the yelling. Note that the specified object should have a canvas with a Text UI element.
4
4: Options Presenter
|
1 2 3 4 5 6 7 8 9 10 11 12 13 14 15 16 17 18 19 20 21 22 23 |
public class Conversation4 : MyFluentDialogue { public override FluentNode Create() { return Yell(“I’m looking for my cat”) * Yell(“Have you seen her ?”) * Show() * Options ( Option(“Nope”) * Hide() * Yell(“;-(“) * End() * Option(“Should I go find her ?”) * Hide() * Yell(“Yes please!”) * Yell(“I’d prefer a persian!”) * End() ); } } |
Code
In this example we introduce a new FluentNode called Options( ), which contain one or more Option( ) FluentNodes. Option( )’s first argument specifies the text that will be presented to the user. The FluentNodes following an Option( ) will be executed when that option is selected. Options are presented by an OptionsPresenter.
Setup
An OptionsPresenter script needs to be added to your Talk object to show options.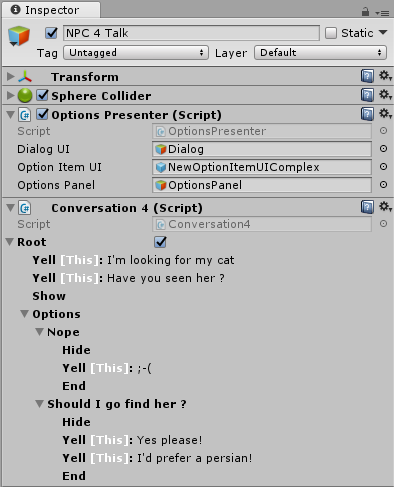
On the OptionsPresenter you specify 3 things
- Dialog UI is the UI element that will be SetActive when the Show() or Hide() FluentNodes are executed.
- Option Item UI is a prefab that will be used for your Option Items. The Option Item prefab needs to have a Text component, which will be set to the specified option text.
- Options Panel is the panel that will be used as the container of the option items
5
5: Write
|
1 2 3 4 5 6 7 8 9 10 11 12 13 14 15 16 17 18 19 20 21 22 23 24 25 26 27 28 29 30 31 32 |
public class Conversation5 : MyFluentDialogue { public Text OtherTextElement; public override void OnFinish() { OtherTextElement.text = “”; base.OnFinish(); } public override FluentNode Create() { return Show() * Write(0, “<color=#0000ffff>Write writes to a text element”) * Options ( Option(“This dialog looks different!”) * Write(0.5f, “Yes!”) * Write(“Dialogs and options are user definable prefabs!\nYou need to press a button to continue this Write”).WaitForButton() * Option(“Write to an element specified in code”) * Write(OtherTextElement, 0, “This text element is specified in code!”) * Option(“Bye”) * Hide() * Yell(“Bye bye!”) * End() ); } } |
Code
Here we introduce a new FluentNode. The Write node will write text to a specified UI element.
Setup
We need to add a WriteHandler to the talking object.
There are 3 things we can specify on Write Handler
- Text UI is the Text UI element the text will be written to
- Seconds / Character is the delay per character while writing
- Optionally Button Element is the button that will be shown after the text has been written. The user will have to press the button before execution continues
6
6: Branching
|
1 2 3 4 5 6 7 8 9 10 11 12 13 14 15 16 17 18 19 20 21 22 23 24 25 26 27 28 29 30 31 32 33 34 35 36 37 |
public class Conversation6 : MyFluentDialogue { public GameObject redGuy; public override FluentNode Create() { return Show() * Options ( Write(0, “Lets look at an example with multiple branches”) * Option(“That red guy…”) * Write(0, “What about him ?”) * Options ( Option(“Whats his name ?”) * Write(0, “He’s just an extra in the show, pay no mind”) * Option(“Do you think he’s into pink ?”) * Hide() * Yell(redGuy, “I heard that!”) * Show() * Write(0, “… maybe we shouldnt talk about him anymore”) * Option(“Back”) * Back() ) * Option(“Bye”) * Hide() * Yell(“Bye bye!”) * End() ); } } |
Code
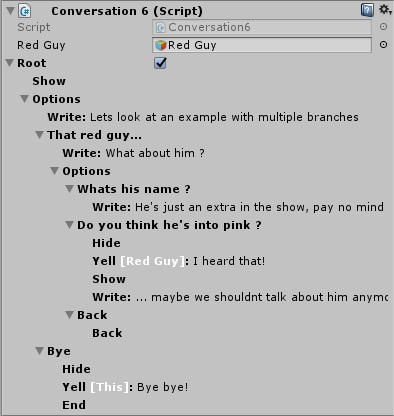
This example shows that an Option can have an Options FluentNode as one of it’s children. Use Back( ) to instruct an Option to cause the dialogue to go back up the tree.
7
7: Running Code
|
1 2 3 4 5 6 7 8 9 10 11 12 13 14 15 16 17 18 19 20 21 22 23 24 25 26 27 28 29 30 31 32 33 34 35 36 |
public class Conversation7 : MyFluentDialogue { Color pink = new Color(1.0f, 0.412f, 0.706f); Color blue = Color.blue; private void PlayerColor(Color color) { Player.Instance.gameObject.GetComponentInChildren().color = color; } public override FluentNode Create() { return Show() * Write(0, “Time to realise your choices affect the world!”) * Options ( Option(“Make me pink!”) * Write(“Abara Kadabara!”) * Do(() => PlayerColor(pink)) * Option(“Make me blue!”) * Hide() * Yell(“Abara Kadabara!”) * Do(() => PlayerColor(blue)) * Pause(1) * Show() * Option(“Bye !”) * Hide() * Yell(“Bye bye!”) * End() ); } } |
Code
Here we introduce a new FluentNode. Do executes a delegate.
8
8: VisibleIf
|
1 2 3 4 5 6 7 8 9 10 11 12 13 14 15 16 17 18 19 20 21 22 23 24 25 26 27 28 29 30 |
public class Conversation8 : MyFluentDialogue { public GameObject player; bool gotHorsey = false; public override FluentNode Create() { return Show() * Write(0, “Options can be shown or hidden based on code!”) * Options ( Option(“I want a HORSEY!”).VisibleIf(() => !gotHorsey) * Write(“Here you go!”) * Do(() => gotHorsey = true) * Option(“My horsey died! Give me another one!”).VisibleIf(() => gotHorsey) * Write(“That was the only one in the world!”) * Hide() * Yell(player, “:(“) * Show() * Option(“Bye!”) * Hide() * Yell(“Bye bye!”) * End() ); } } |
Code
There is a method on Option called VisibleIf( ) which takes a delegate, if that delegate returns true then that option will be shown.
9
9: Click Initiator
|
1 2 3 4 5 6 7 |
public class Conversation9 : MyFluentDialogue { public override FluentNode Create() { return Yell(“You clicked on me!”); } } |
Code
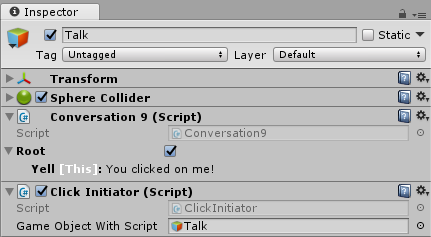
By default FluentScript looks for a GameActionInitiator, if it doesn’t find one it automatically adds a ProximityInitiator. For clicking to work we add the ClickInitiator script to our object.
10
10: Parallel Chains
|
1 2 3 4 5 6 7 8 9 10 11 12 13 14 15 16 17 18 19 20 21 22 23 24 25 26 27 28 29 30 31 32 33 34 35 36 37 |
public class Conversation10 : MyFluentDialogue { FluentNode Speak(string text, string soundResource) { return Parallel ( Write(text) * Sound(soundResource) ); } public override FluentNode Create() { return Show() * Options ( Write(0, “We can run multiple responses in parallel!”) * Option(“Make multiple responses happen at the same time!”) * Speak(“Here is some text being printed, while a sound is being played!”, “Sounds/hello”) * Option(“Can I chain parallel nodes ?”) * Write(“What follows is both sound and text that has to finish before the next sound and text can play”) * Speak(“Yes”, “Sounds/yes”) * Speak(“We can chain parallel responses”, “Sounds/chainparallel”) * Option(“Bye!”) * Hide() * Parallel ( Yell(“Bye bye!”) * Sound(“Sounds/byebye”) ) * End() ); } } |
Code
Here we introduce a new FluentNode. Sound( ) will play an audio resource. There exist cases where we want multiple FluentNodes to execute at the same time. Playing sounds while text is being written is a good example. The nodes specified in a Parallel node will all execute at the same time. Parallel will only complete once all it’s parallel nodes have finished. Note here we created a helper method that combines writing and playing sound in one convenient method.
11
11: Only Once
|
1 2 3 4 5 6 7 8 9 10 11 12 13 14 15 16 17 18 19 20 21 22 23 |
public class Conversation11 : MyFluentDialogue { public override FluentNode Create() { return Show() * Write(“Only once responses will happen again when the conversation is restarted”) * Options ( Option(“What is the secret message ?”) * Once ( Write(“OOOGABOOGA!”) ) * Write(“Restart the conversation to hear the secret again”) * Option(“Bye!”) * Hide() * Yell(“Bye bye!”) * End() ); } } |
Code
Nodes within Once will only be executed once for the current conversation, but will happen again if the conversation is restarted.
12
12: If
|
1 2 3 4 5 6 7 8 9 10 11 12 13 14 15 16 17 18 19 20 21 22 23 24 |
public class Conversation12 : MyFluentDialogue { int timesVisited = 0; public override FluentNode Create() { return Do(() => timesVisited++) * If(() => timesVisited == 1, Yell(“I havent seen you before”) * Yell(“Lets be friends!”) * Yell(“Talk to me again sometime”) ) * If(() => timesVisited == 2, Yell(“I’m going to count your visits!”) ) * If(() => timesVisited >= 2, Yell(“Visit number “ + timesVisited)); } } |
Code
Here we introduce a new FluentNode. The If node takes a bool delegate as it’s first parameter and a fluent chain as it’s second. The fluent chain will be executed if the bool delegate returns true. It is important to note that the visited number string concatenation in this example is evaluated before the Do() response is executed. If you would like the string to be evaluated at execution time then you need to use Eval(( ) => “Visit number ” + timesVisited)
13
13: Multilingual
|
1 2 3 4 5 6 7 8 9 10 11 12 13 14 15 16 17 18 19 20 21 22 23 24 25 26 27 28 29 30 31 32 33 34 35 36 37 38 39 40 41 42 43 44 45 46 47 48 49 50 51 52 53 54 55 56 57 58 59 60 61 62 63 64 65 66 67 68 69 70 71 72 73 74 75 76 77 78 79 80 81 82 83 |
public class Conversation13 : MyFluentDialogue { private void SetLanguage(Language language) { LanguageManager.CurrentLanguage = language; } public override void OnFinish() { LanguageManager.CurrentLanguage = Language.English; base.OnFinish(); } public override FluentNode Create() { return Show() * Write(0, speakManyLanguages) * Options ( Option().Text(switchToEnglish).VisibleIf(() => LanguageManager.CurrentLanguage != Language.English) * Do(() => SetLanguage(Language.English)) * Option().Text(switchToChinese).VisibleIf(() => LanguageManager.CurrentLanguage != Language.Mandarin) * Do(() => SetLanguage(Language.Mandarin)) * Option().Text(switchToAfrikaans).VisibleIf(() => LanguageManager.CurrentLanguage != Language.Afrikaans) * Do(() => SetLanguage(Language.Afrikaans)) * Option().Text(singMeASong) * Write(singSong) * Option().Text(bye) * Hide() * Yell(bye) * End() ); } object[] singSong = { Language.English, englishSong, Language.Afrikaans, afrikaansSong, Language.Mandarin, mandarinSong}; object[] speakManyLanguages = { Language.English, “I speak a couple of languages”, Language.Afrikaans, “Ek praat ‘n paar tale”, Language.Mandarin, “我讲几种语言”}; object[] switchToEnglish = { Language.Mandarin, “改用普通话 (*)”, Language.Afrikaans, “Skuif na Engels (*)”}; object[] switchToChinese = { Language.English, “Switch to Mandarin”, Language.Afrikaans, “Skuif na Shinees”}; object[] switchToAfrikaans = { Language.English, “Switch to Afrikaans”, Language.Mandarin, “切换到南非荷兰语”}; object[] singMeASong = { Language.English, “Sing me a song!”, Language.Afrikaans, “Sing vir my ‘n liedjie!”, Language.Mandarin, “唱歌”}; object[] bye = { Language.English, “Bye”, Language.Afrikaans, “Totsiens”, Language.Mandarin, “再见”}; const string afrikaansSong = @”Wielie, Wielie, Waalie! Die aap ry op sy baalie! Tjoef tjaf val hy af Wielie, Wielie, Waalie!”; const string englishSong = @”Ring-a-round the rosie, A pocket full of posies, Ashes! Ashes! We all fall down!”; const string mandarinSong = @”我们 是 共产主义 接班人 继承 革命 先辈 的 光荣 传统 爱 祖国 爱 人民 鲜艳 的 红领巾 飘扬 在 前胸”; } |
Code
14
14: ContinueWhen
|
1 2 3 4 5 6 7 8 9 10 11 12 13 14 15 16 17 18 19 20 21 22 23 24 25 26 27 28 29 30 31 32 33 34 35 |
public class Conversation14 : MyFluentDialogue { public GameObject blueGuy2; public GameObject player; public bool HasVisitedRed { get; set; } bool cameBackForPrize { get; set; } public override void OnStart() { HasVisitedRed = false; cameBackForPrize = false; } public override FluentNode Create() { return Yell(“Stand next to that red guy”) * ContinueWhen(() => HasVisitedRed) * Yell(blueGuy2, “Well done!”) * Yell(blueGuy2, “Go back for your prize!”) * ContinueWhen(() => cameBackForPrize) * Yell(player, “Prize please!”) * Yell(“It was stolen!”) * Yell(player, “;-(“); } void OnTriggerEnter(Collider collider) { if (HasVisitedRed) cameBackForPrize = true; } } |
|
1 2 3 4 5 6 7 8 9 10 11 |
using UnityEngine; public class BlueGuy2 : MonoBehaviour { public GameObject NPC14; void OnTriggerEnter(Collider collider) { NPC14.GetComponentInChildren().HasVisitedRed = true; } } |
Code
Here we introduce a new FluentNode. ContinueWhen polls the passed in delegate and continues down the fluent chain once the delegate return true.
15
15: Custom Conversation
|
1 2 3 4 5 6 7 8 9 10 11 12 13 14 15 16 17 18 |
public class Conversation15 : ConversationWithImage { public override FluentNode Create() { return Show() * Write(0, “I am Balrog-the-great!\n\n” + “This is a custom conversation that lets you set an image in the editor which will be displayed by the options presenter”) * Options ( Option(“Bye Balrog!”) * Hide() * Yell(“The GREAT!”) * End() ); } } |
|
1 2 3 4 5 6 7 8 9 10 11 12 13 14 15 16 17 18 19 20 21 |
using UnityEngine; using UnityEngine.UI; using Fluent; public abstract class ConversationWithImage : MyFluentDialogue { public Sprite CharacterHeadSprite; public override void OnStart() { SetNPCHead(); base.OnStart(); } private void SetNPCHead() { OptionsPresenter optionsPresenter = GetComponent(); Image image = optionsPresenter.DialogUI.transform.Find(“NPCHeadImage”).GetComponent(); image.sprite = CharacterHeadSprite; } } |
Code
Here we again extend FluentScript, this time by allowing us to set an image of our NPC in the editor.
16
16: While
|
1 2 3 4 5 6 7 8 9 10 11 12 13 14 15 16 17 18 19 20 21 22 23 24 25 26 27 28 29 30 31 32 33 34 35 36 37 38 39 40 41 42 43 44 45 46 47 48 49 50 51 52 53 54 55 56 57 58 59 60 61 62 63 64 65 66 67 68 69 70 71 72 73 74 75 76 77 |
public class Conversation16 : MyFluentDialogue { public int EnemyHealth = 10; public GameObject PlayerGameObject; bool stillFighting = true; public override void OnStart() { EnemyHealth = 10; stillFighting = true; base.OnStart(); } void DoDamage(int damage) { EnemyHealth -= damage; if (EnemyHealth <= 0) stillFighting = false; } FluentNode AttackOption(string itemName, string yell, int damage) { return Option(itemName) * Hide() * Yell(PlayerGameObject, yell) * Yell(“You delt “ + damage + ” damage”) * Do(() => DoDamage(damage)) * Yell(Eval(() => EnemyHealth + ” hp left”)) * Show() * If(() => EnemyHealth <= 0, Hide() * Yell(“I died!”) * Yell(“You win!”) ) * End(); } FluentNode SpellList() { return Options ( AttackOption(“Magic Missile”, “Missles away!”, 4) * AttackOption(“Fairy Fire”, “Boom!”, 2) * Option(“Back”) * Back() ); } public override FluentNode Create() { return Show() * While(() => stillFighting, Show() * Options ( If(() => EnemyHealth >= 10, Write(0, “You will NEVER defeat me !!”)) * If(() => EnemyHealth >= 6 && EnemyHealth < 10, Write(0, “I’v been hurt!”)) * If(() => EnemyHealth >= 2 && EnemyHealth < 6, Write(0, “Awwwwwwww! Stop that!”)) * Option(“Spells”) * Write(0, “Choose a spell”) * SpellList() * AttackOption(“Melee”, “Hand 2 Hand!”, 2) * Option(“Flee”) * Hide() * Yell(“Coward!”) * Do(() => stillFighting = false) * End() ) ); } } |
Code
While, like If, takes a delegate as the first parameter and a fluent chain as the second. In this example the conversation will continue until stillFighting is false.
